Inputs

Contents
Settings
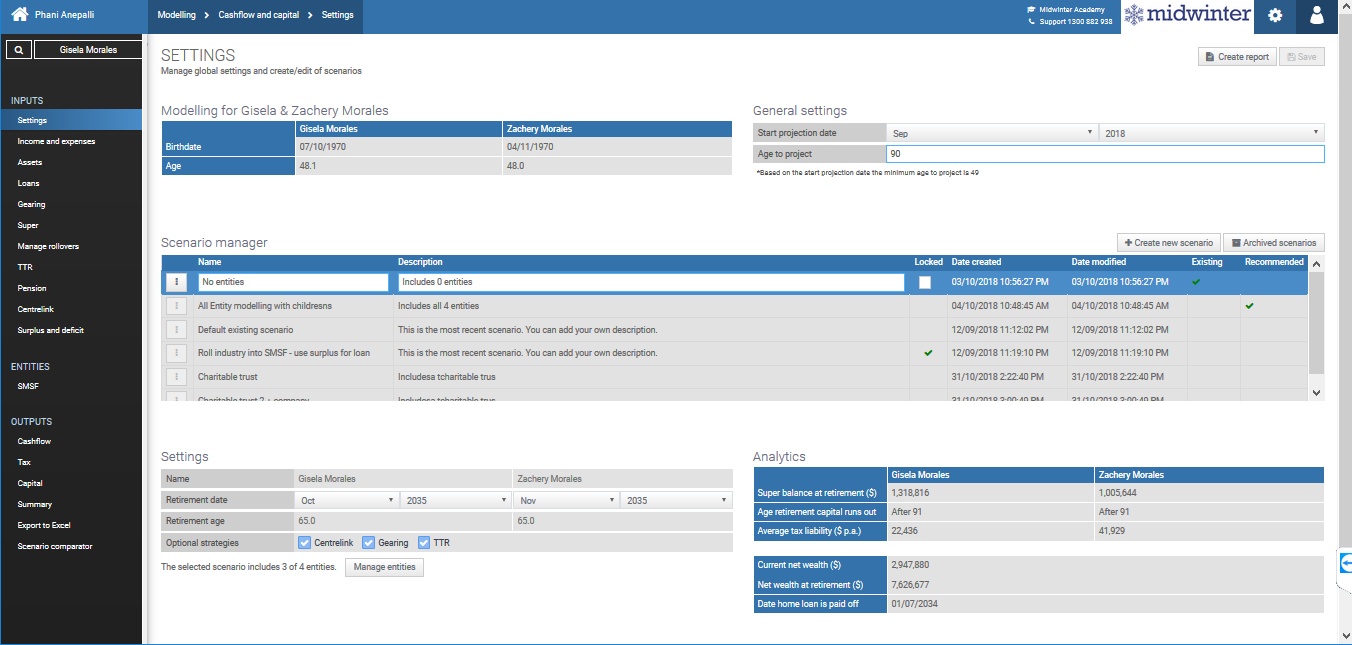
The settings menu will contain all the information as pulled through from fact find in the Edit client module.
❄In General settings you have the ability to alter the start date and age to project. This will prorate the first year of regular contributions in line with the projection start date
❄Scenario manager is where all the different scenarios will appear and where you can switch between multiple scenarios
❄Scenario comparator- In the scenario comparator you are able to view a projection table along with a graph to view a comparison of the different scenarios entered
❄In Current scenario, you are able to update information from fact find and a pop up window will allow you to view and select the assets that will be pulled through into the scenario
❄Create new scenario and alter retirement date for current or new scenario
❄Generate report directly from Cashflow and Capital
❄Include or exclude optional strategies to include in your modelling- the input menu will change depending on which strategies you include
❄Analytics for a summary of the different scenarios selected
Income and expenses
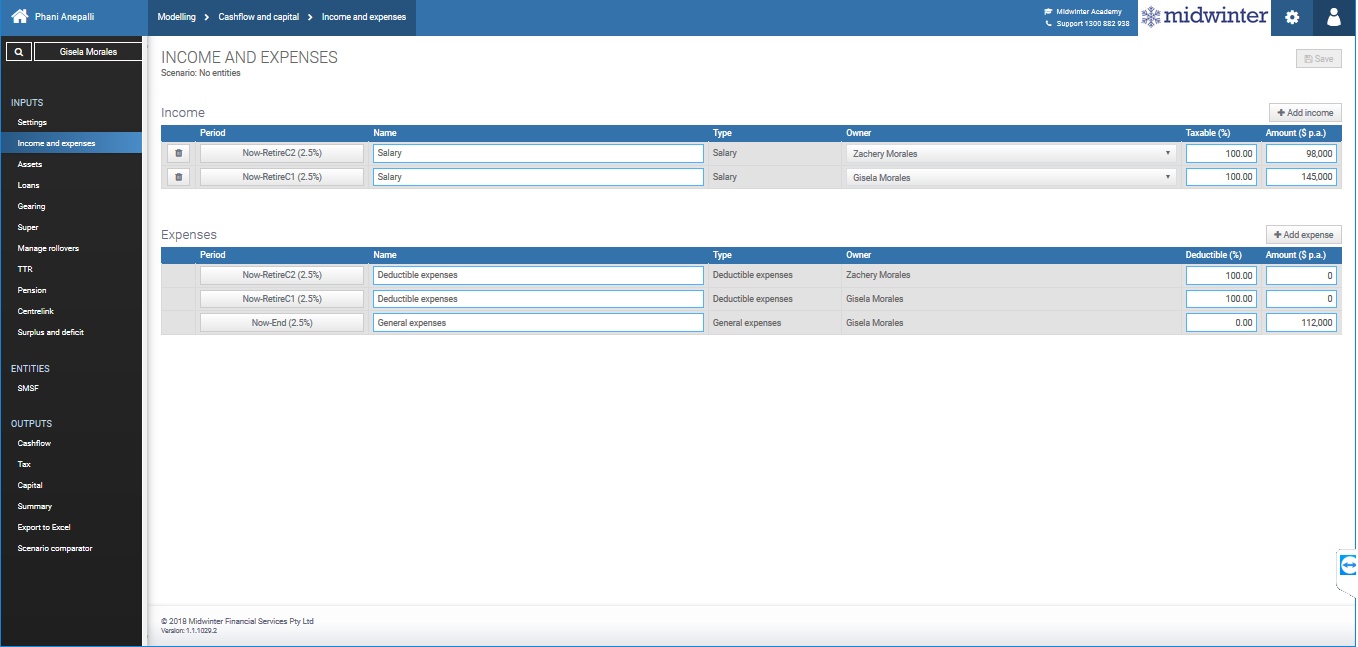
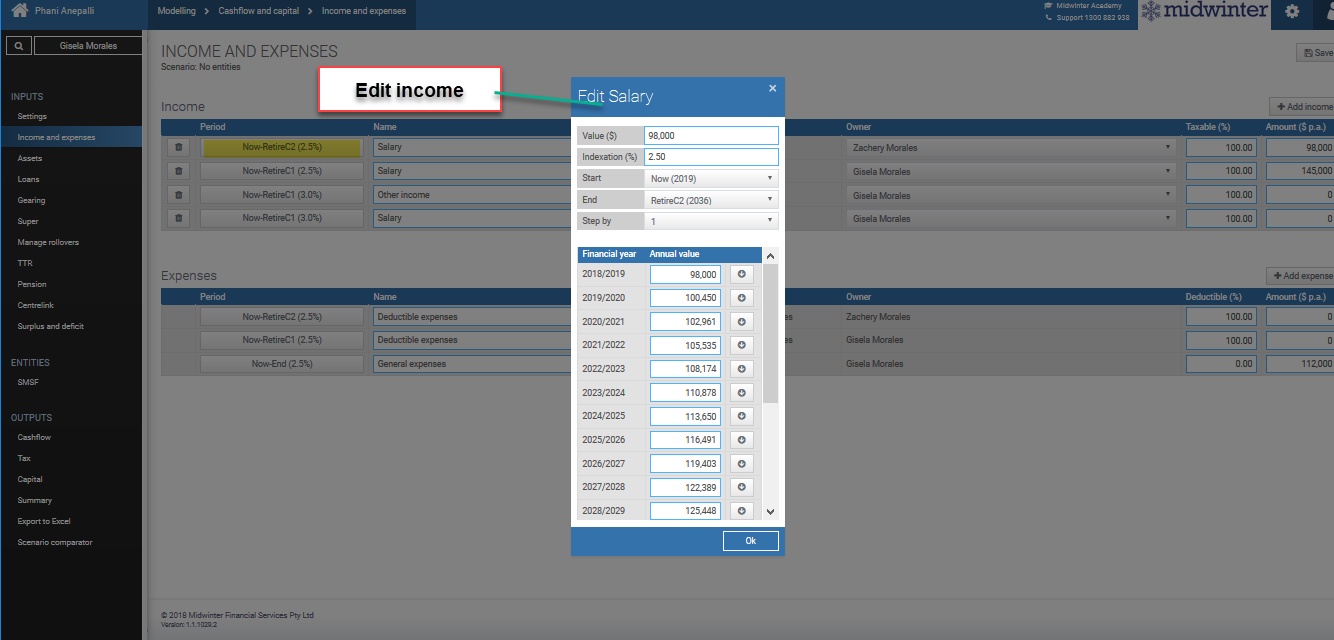
The information in income and expenses will show the information as pulled through from the fact find and is used to get a brief cashflow position of your clients.
In the income section you can view income type, owner, and percentage of the income that is taxable.
Clicking the start and end button brings you to a summary to view and/or amend the annual income amount for each taxable year as required.
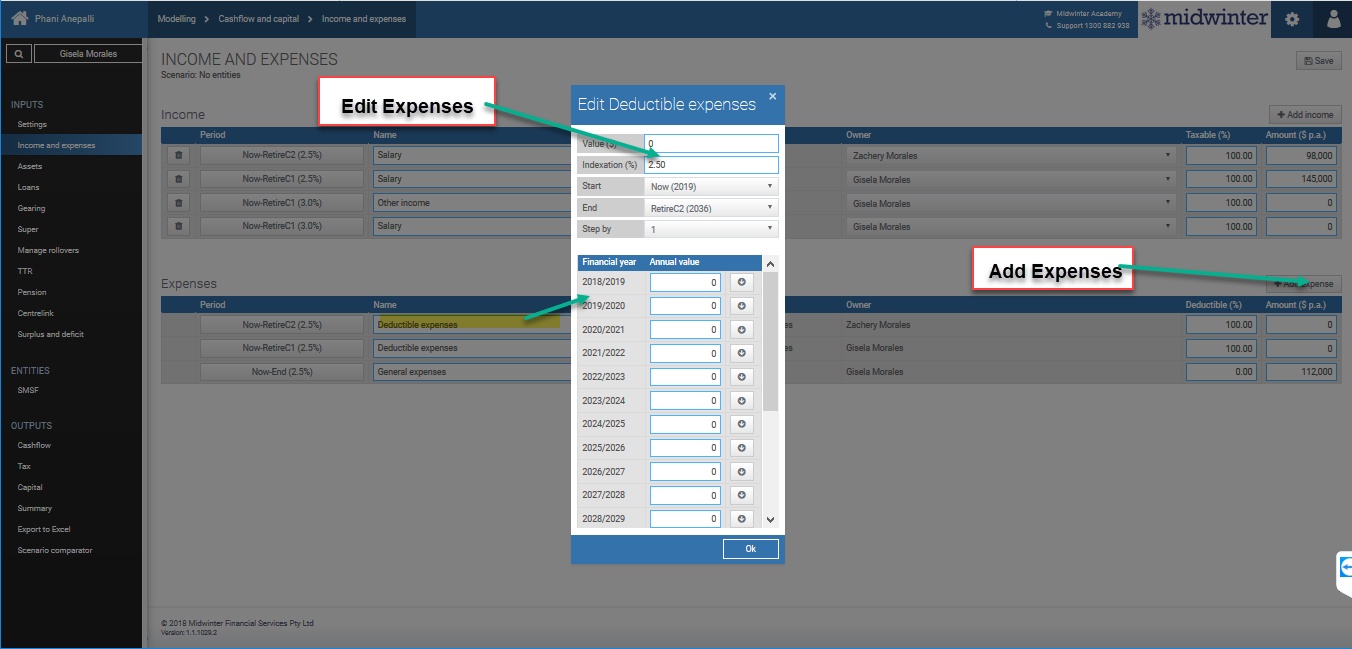
You are able to view and amend the expenses section in a similar way to the income section and view and/or amend the expenses for each taxable year as required.
Adding an annuity into Cash flow and Capital
When further details are required on how to treat an income, such as a defined benefit income stream, you add this as an annuity.
1.Select client
2.Click” Cashflow and Capital”
3.Select “Income and expenses”
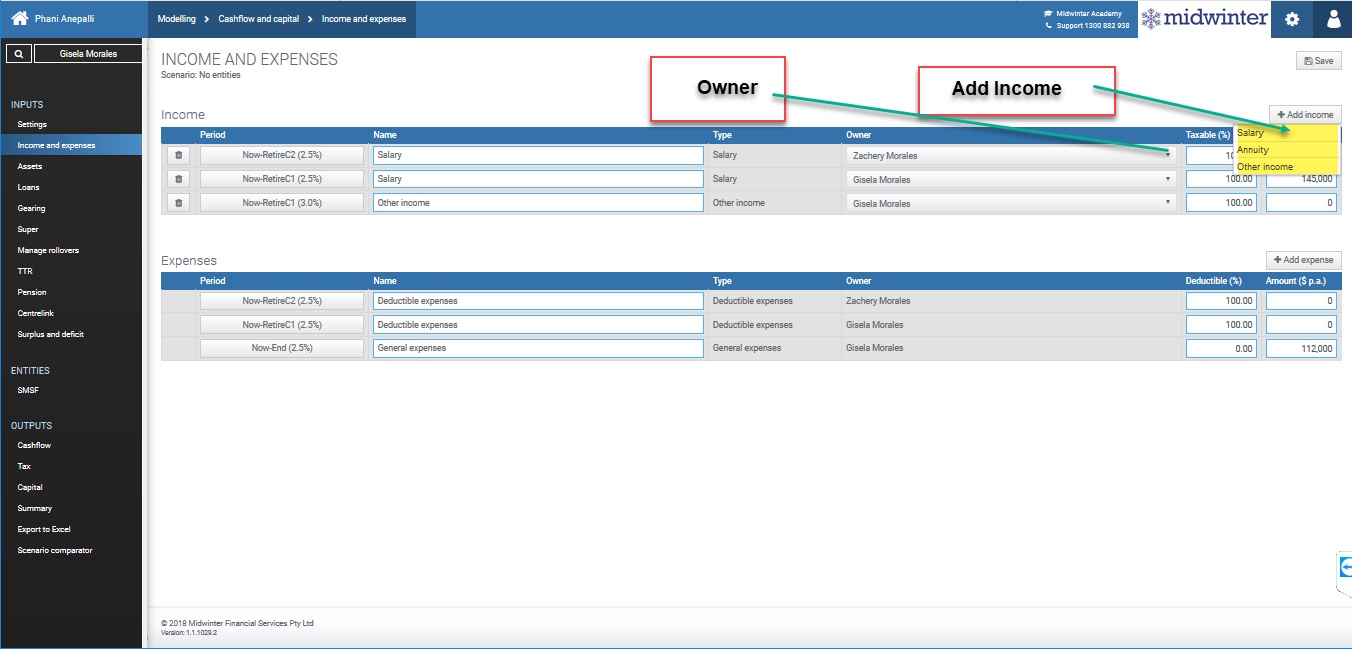
4.Click “Add income”
5.Select “Annuity” from the dropdown box
6.Double click name field to rename
7.Select owner of income
8.Enter taxable percentage and amount manually or
9.Click “Retire C1/2- End” to fine tune the way the income is treated for tax and Centrelink purposes- Edit income stream/annuity pop up window will appear
10.View and/ or amend Indexation
11.Select start of income from dropdown box
12.Select End from drop down box
13.Amend tax and Centrelink assessability
14.Amend tax free proportion
15.Enter amount to include in cashflow
16.Click “OK”
To account for the effect of the income on the Centrelink assets test, select Centrelink in the input section and manually add the amount in the post retirement tab.
Adding a one-off expense
The expenses section of the Income and expenses menu shows your clients general living expenses excluding any loan repayment or savings plans as entered as part of the fact find.
To add a one-off expense rather than a non-cash deductible expense;
1.Click “Add Expense”
2.Select “Other expenses” from dropdown menu
3.Enter name by double clicking name field
4.Select owner
5.Click “Now-End” to edit details
6.Enter value in the edit screen (rather than entering value in the table as this section is for annual recurring amounts)
7.Select financial year for expense
8.Click “OK”
This expense will amalgamate with all general expenses in the cashflow report.
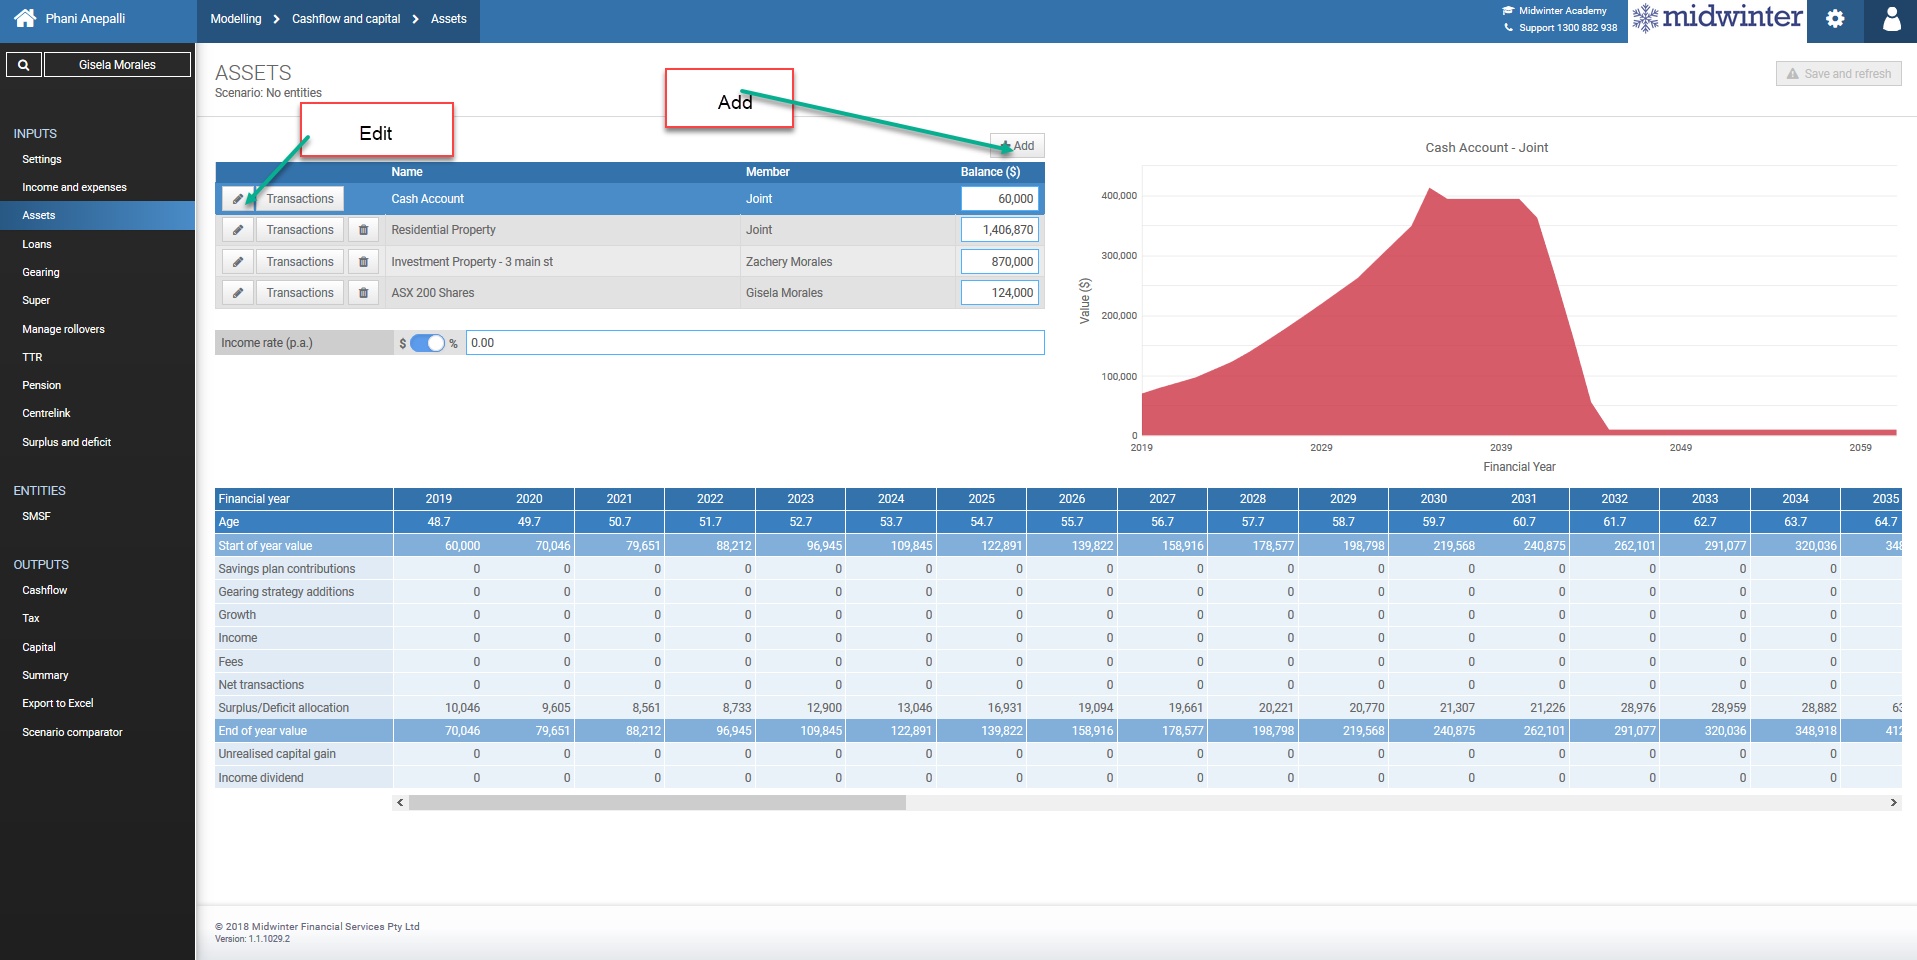
Assets
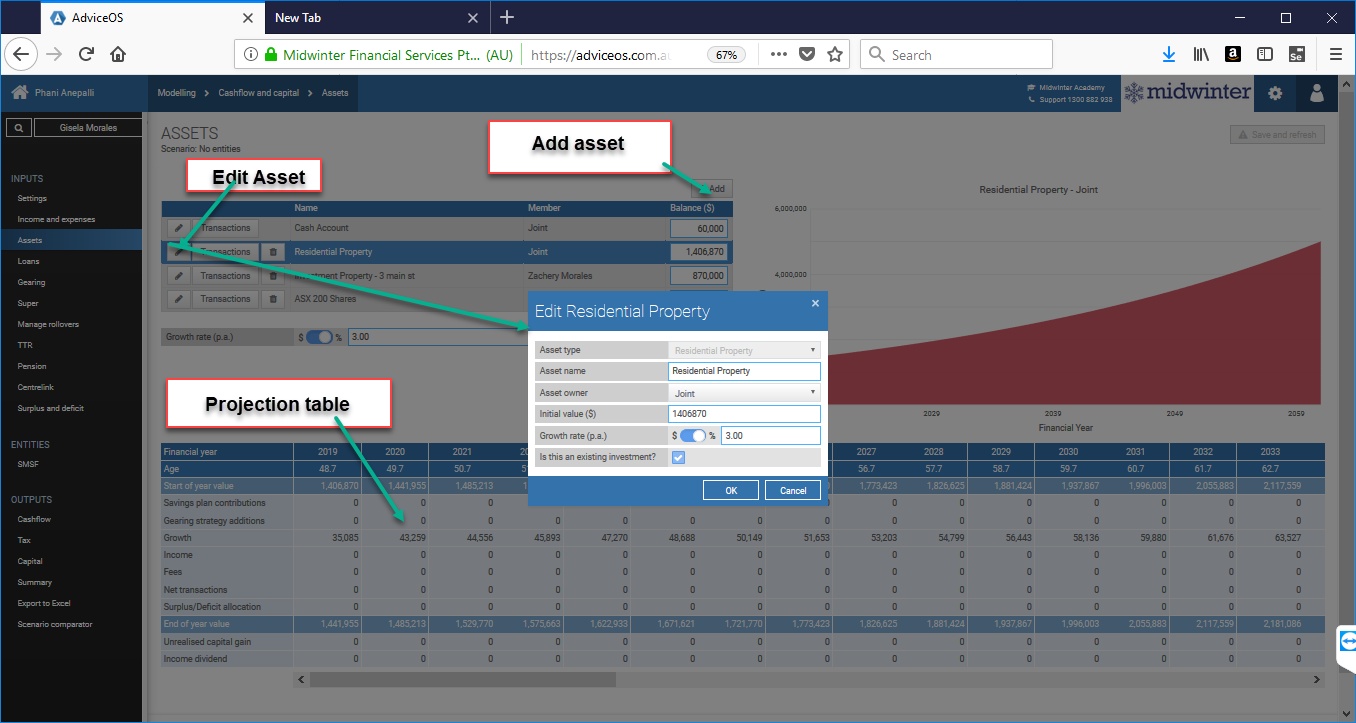
In the assets menu you can view the assets your clients currently hold as pulled through from the fact find, on an individual basis.
By clicking on each asset you can view a graph of the value of the asset over time and also a projection table showing the growth, income, fees and unrealised capital gain of your assets by financial year.
In addition you are able to amend the income and growth rate of each investment and change the default rates and manually enter these in percentage or dollar value as well as editing any details of the asset as required.
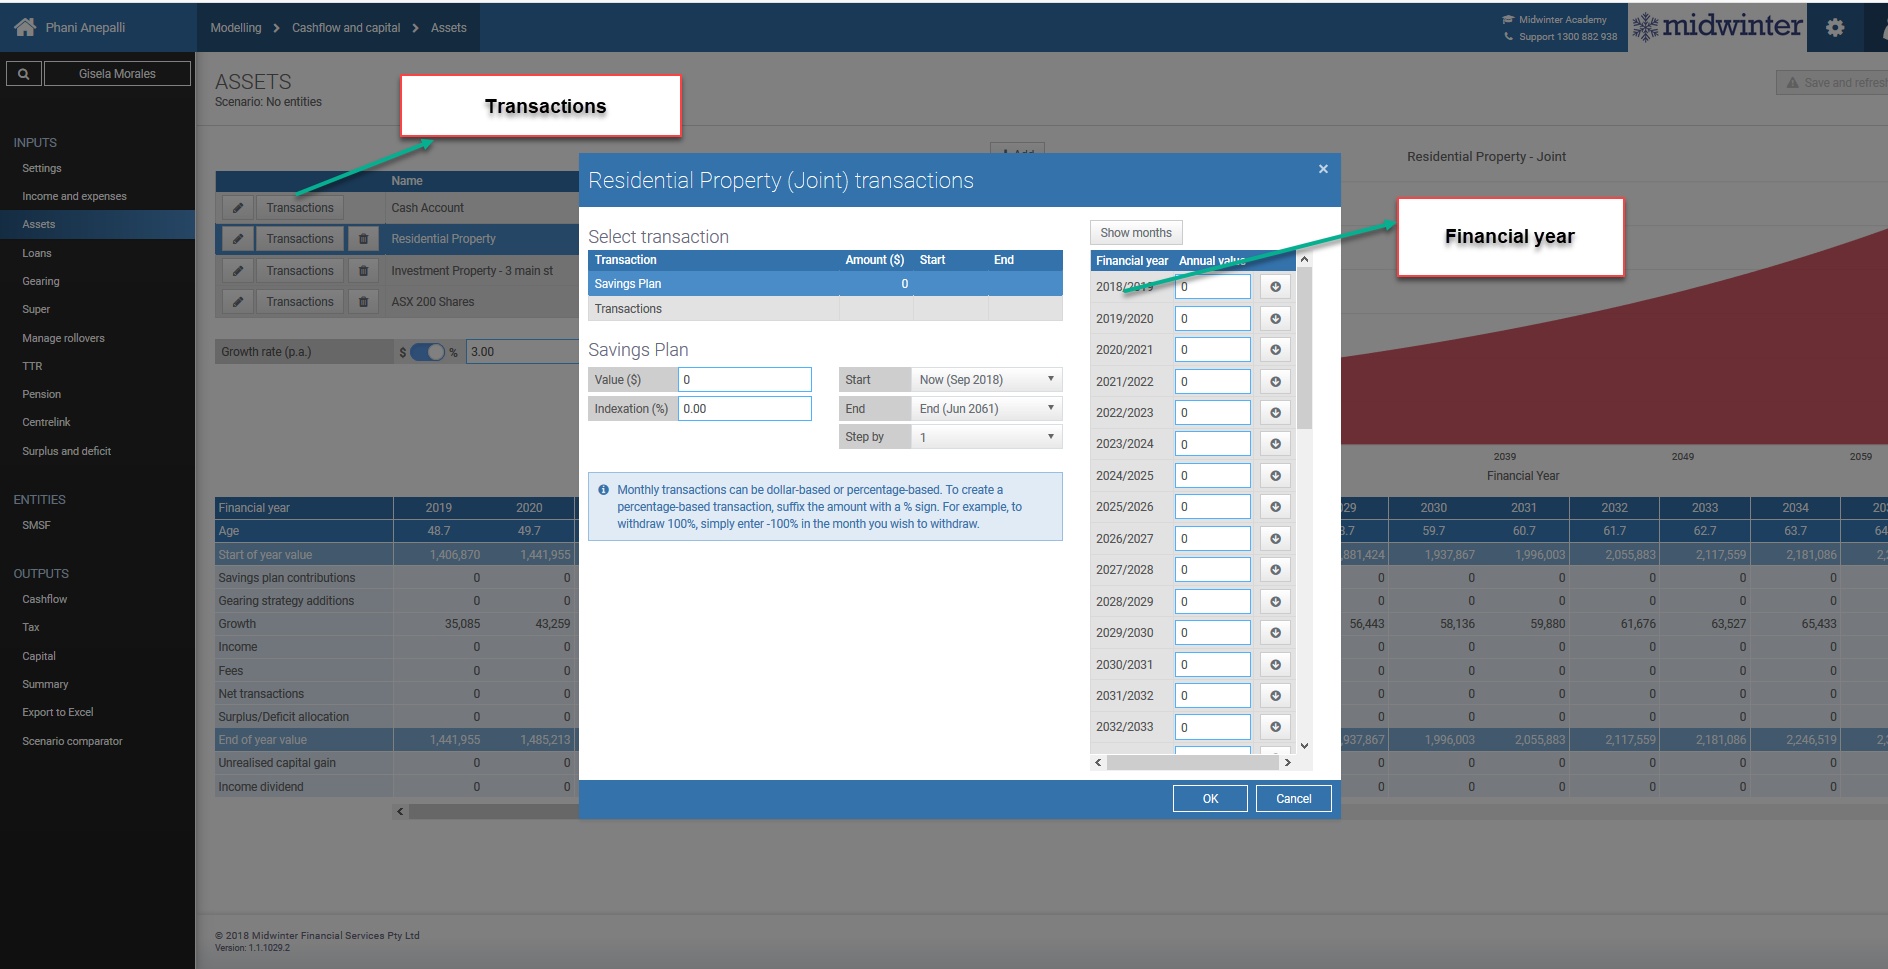
Buy and sell assets
In the asset section you can view the impact on your clients’ cashflow when buying and selling assets.
Selling an asset
1.Select client
2.Click “Cashflow and Capital”
3.Select Assets
4.Click the asset you are selling
5.Click “Edit”
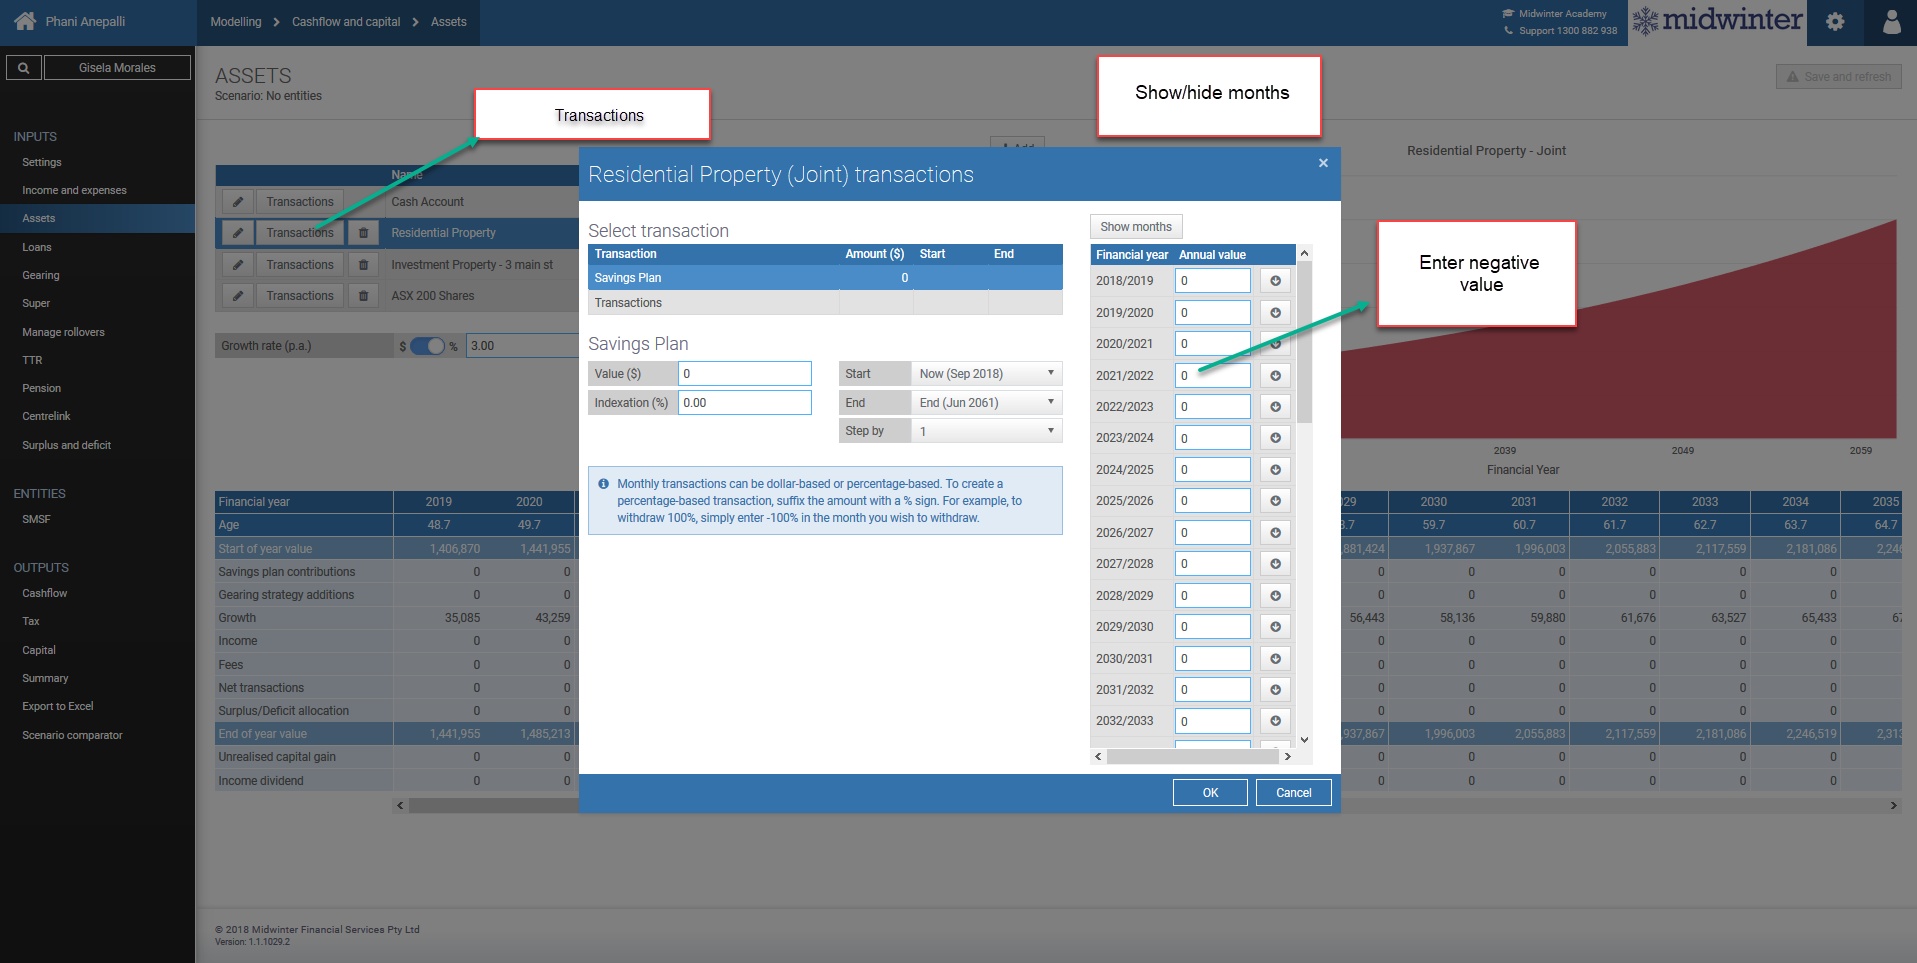
6.Click Transactions tab
7.Select financial year or month you are selling the asset
8.Enter a negative value to sell
9.View the impact of the sale in the projections table and any impact on unrealised capital gain
10.The credit of a sale of an asset will appear in your clients Cash account
11.To reinvest part or full amount raised from the sale of an asset into another asset, click “Add” under the Assets section and complete details as required-Note that the initial value is 0 and enter the amount to credit from the sale in the transactions tab for the financial year /month of the asset sale
12.Click “OK”
13.View impact in the projections table
Buying an asset
As above in the selling an asset section, the steps to buying an asset is almost identical to selling an asset
1.Select client
2.Click “Cashflow and Capital”
3.Select “Assets”
4.Click the asset you are adding to or add additional asset by clicking “Add”
5.Click “Edit”
6.Click Transactions tab
7.Select financial year or month you are selling the asset
8.Enter a positive value to buy
9.View the impact of the acquisition in the projections table and any impact on capital gain
10.The debit for the purchase of an asset will appear in your clients Cash account
11.Click “OK”
12.View impact in the projections table
Loans
The loan menu layout is identical to the asset menu layout. In the loan section you can view any loans that your clients have, as pulled through from the fact find.
In this menu you can also add or edit any loans, amend interest rates and select repayment types or borrow an additional amount to invest into an asset. You can also view a graph of the loan over time and a projection table showing the growth, income, fees and unrealised capital gain of your assets by financial year.
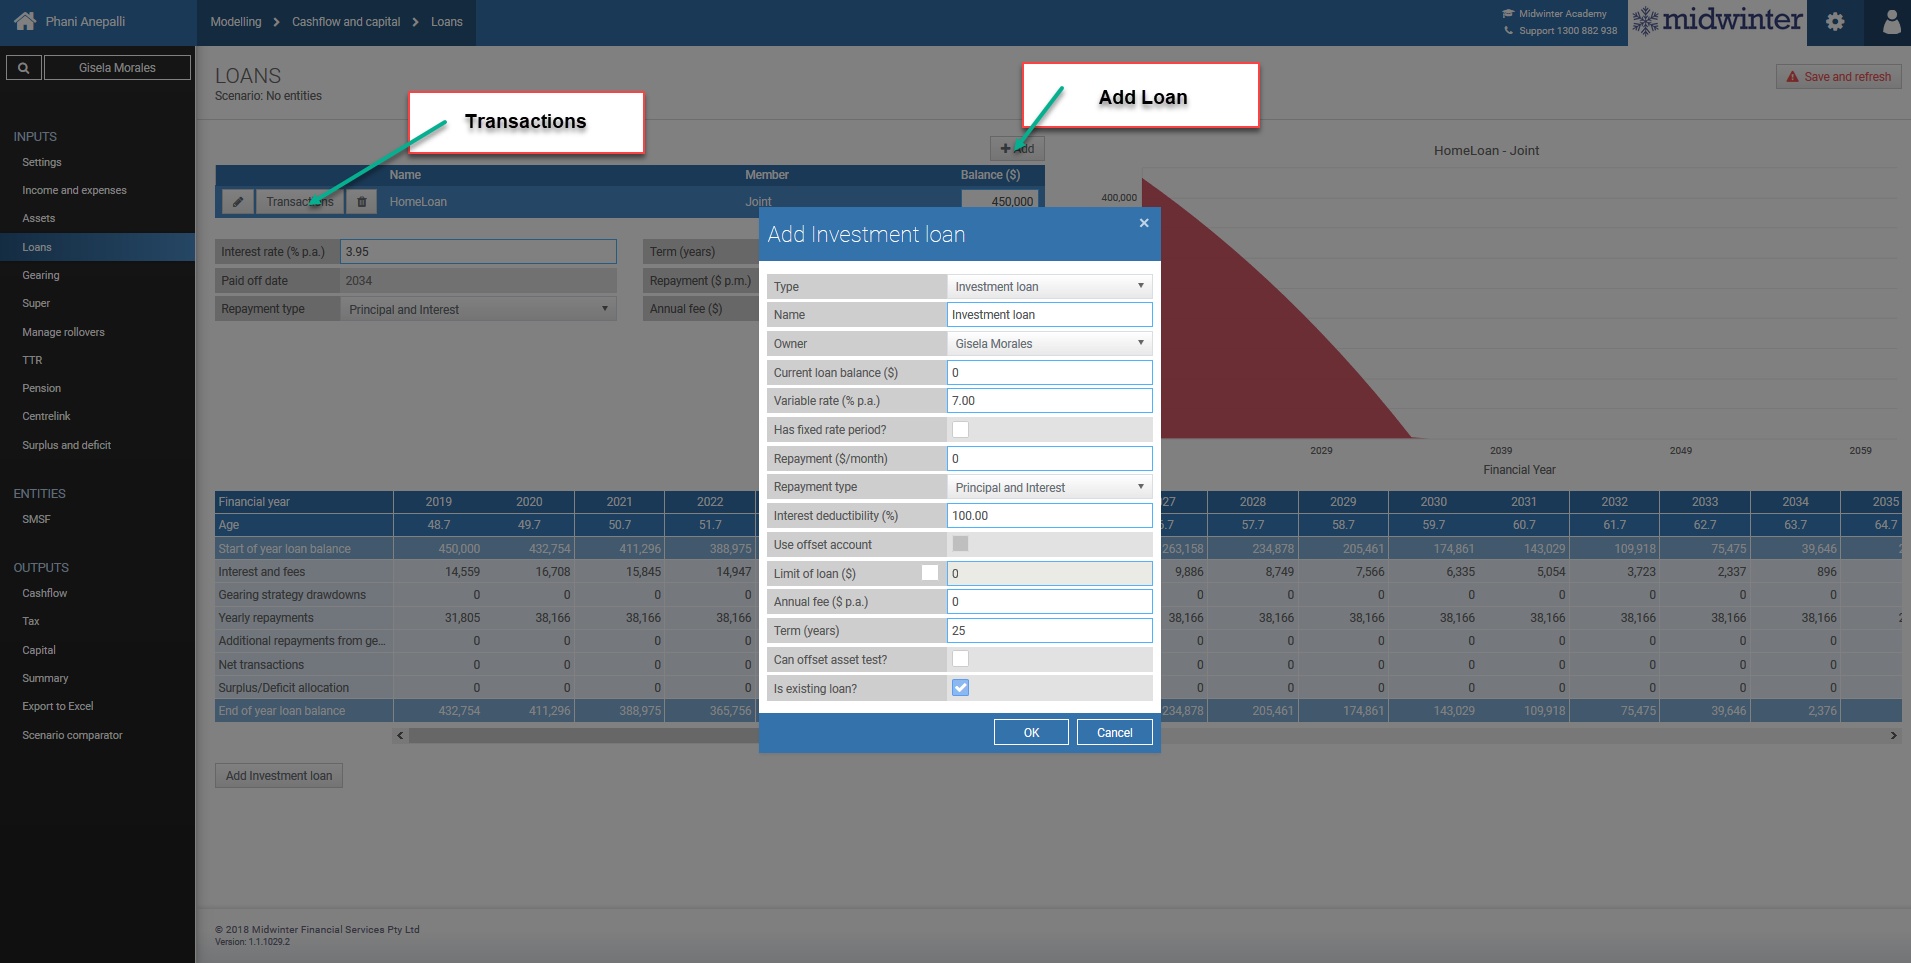
Adding a loan
1.Click “Loans” in the Cashflow and Capital module
2.Click “Add” to add loan
3.Select loan type
4.Enter details as required such as name, owner, variable rate and repayment type in the details tab
5.To add an additional or a one-off repayment, or to redraw from a loan, select Transactions tab to enter value in financial year/month- Any redraw amount will appear as a credit in the cash account to be reinvested into an asset or to repay another loan
**User note: Any sale of an asset or redraw on a loan will end up as a credit in your cash account. To add to an asset or repay a loan, the money is debited from your cash account- not directly from your asset/loan.
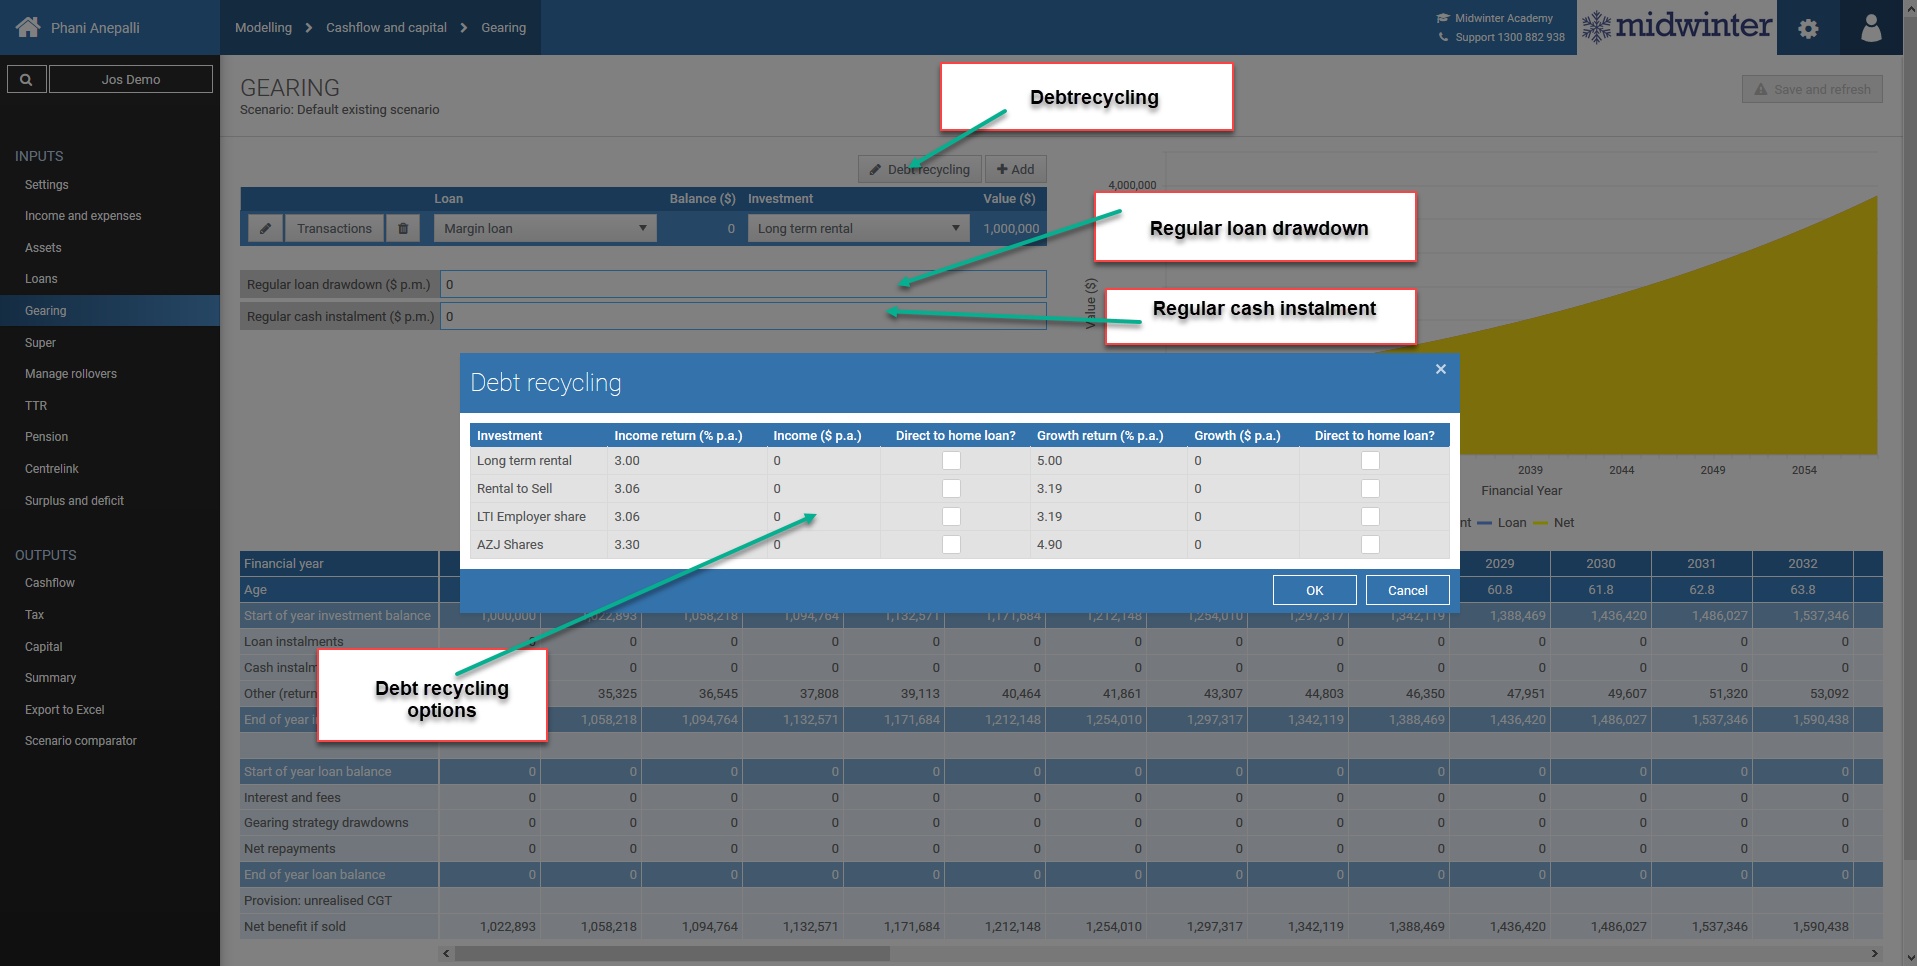
Gearing
The gearing menu helps you set up a gearing strategy for your clients. The pre-requisite for setting a gearing strategy is a loan and investment which can be geared.
In this menu, you can add any regular loan drawdown amount per month to add any amount of money your clients want to contribute ach month coming out of the loan.
In regular cash instalments you can add how much of your clients’ surplus to contribute each month.
In the gearing menu you are also able to add debt recycling for income and/or growth for your clients’ financial assets.
Super
In the super menu you can view your client’s amalgamated superannuation balances into one single value.
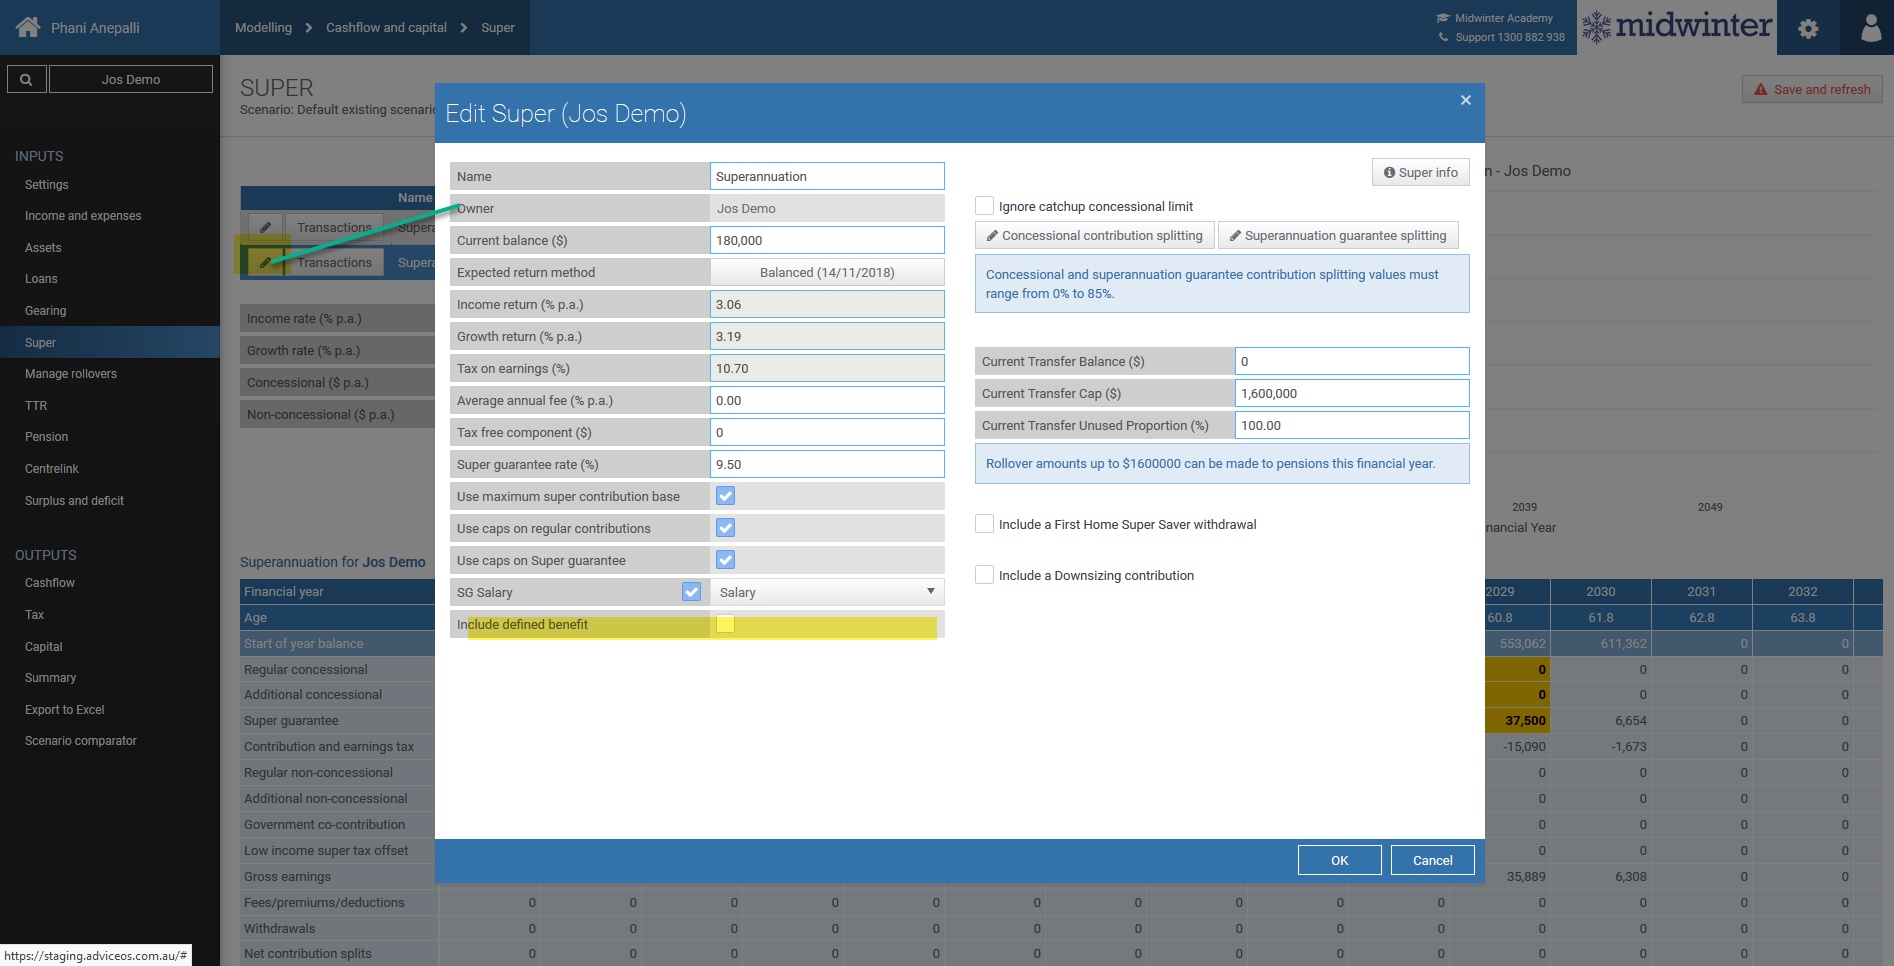
As in the previous input menus you are able to edit the superannuation and make changes to any rates or contributions as required.
By clicking “Manage rollovers” you are able to alter the roll over for your clients from superannuation to an account based pension. AdviceOS rolls over from super to an account based pension as default at retirement age.
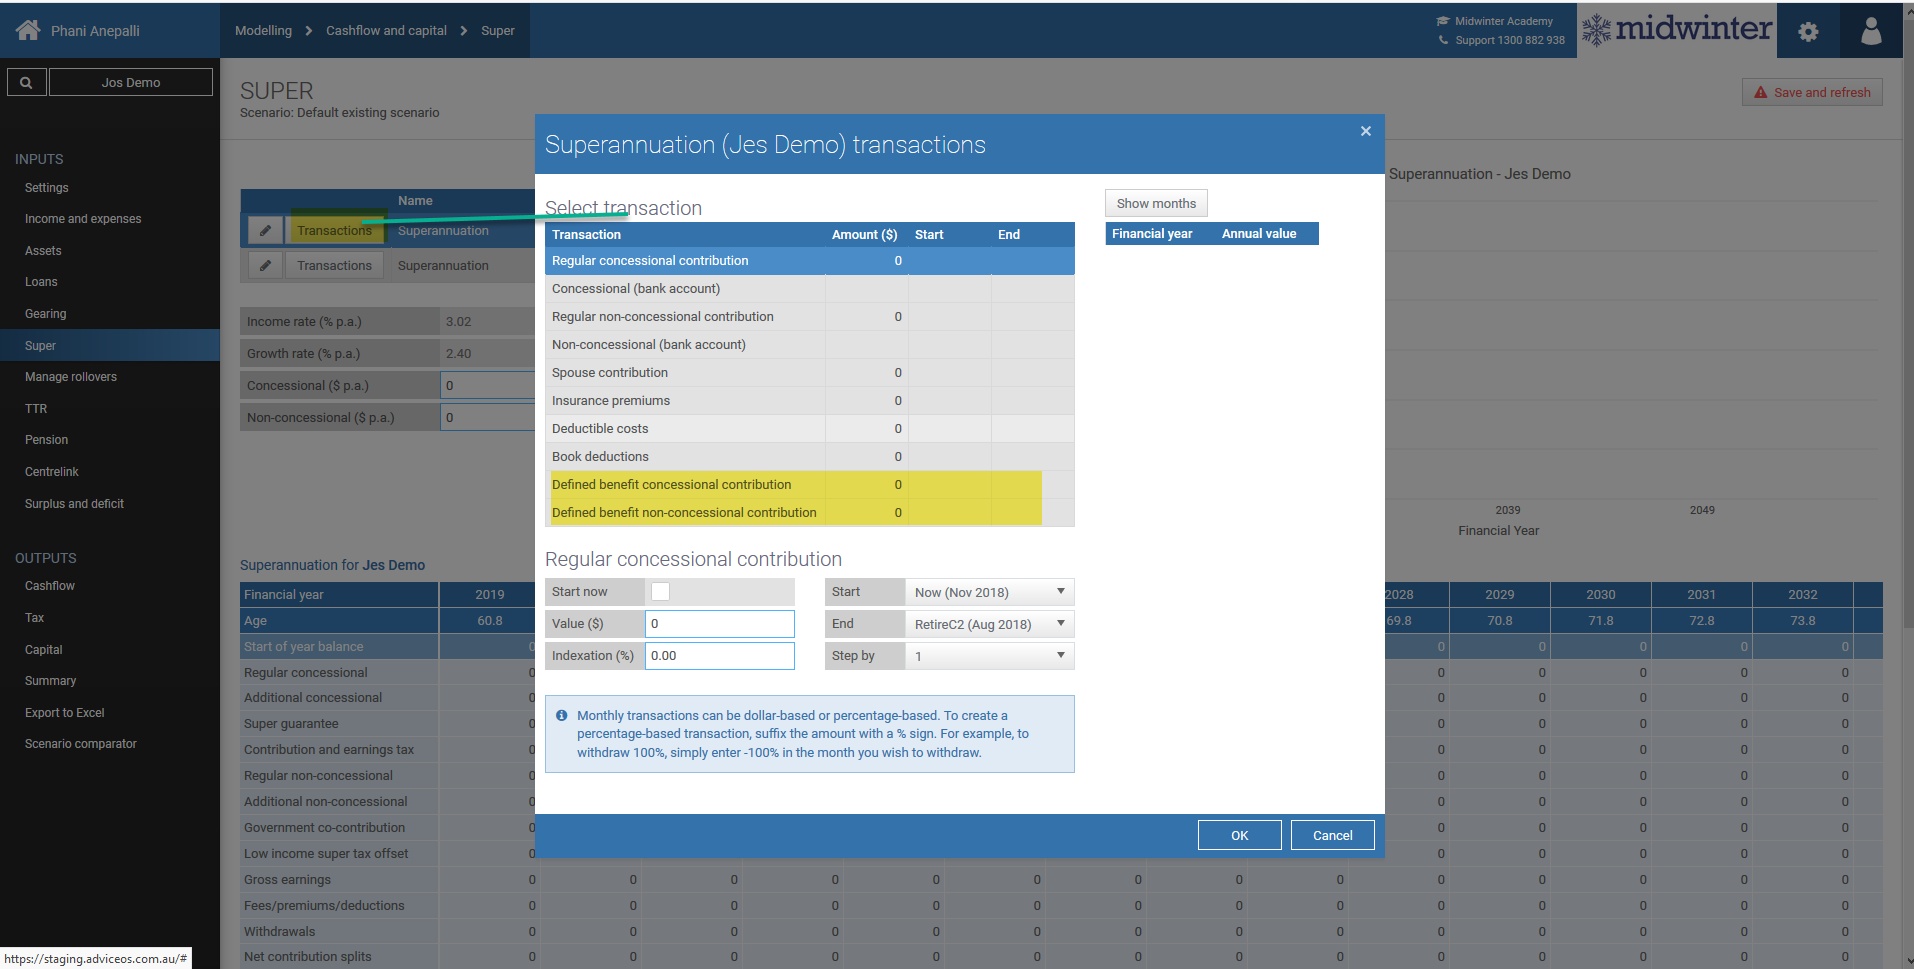
In this screen you can also add an expected defined benefit sum by clicking on the “Include defined benefits” button.
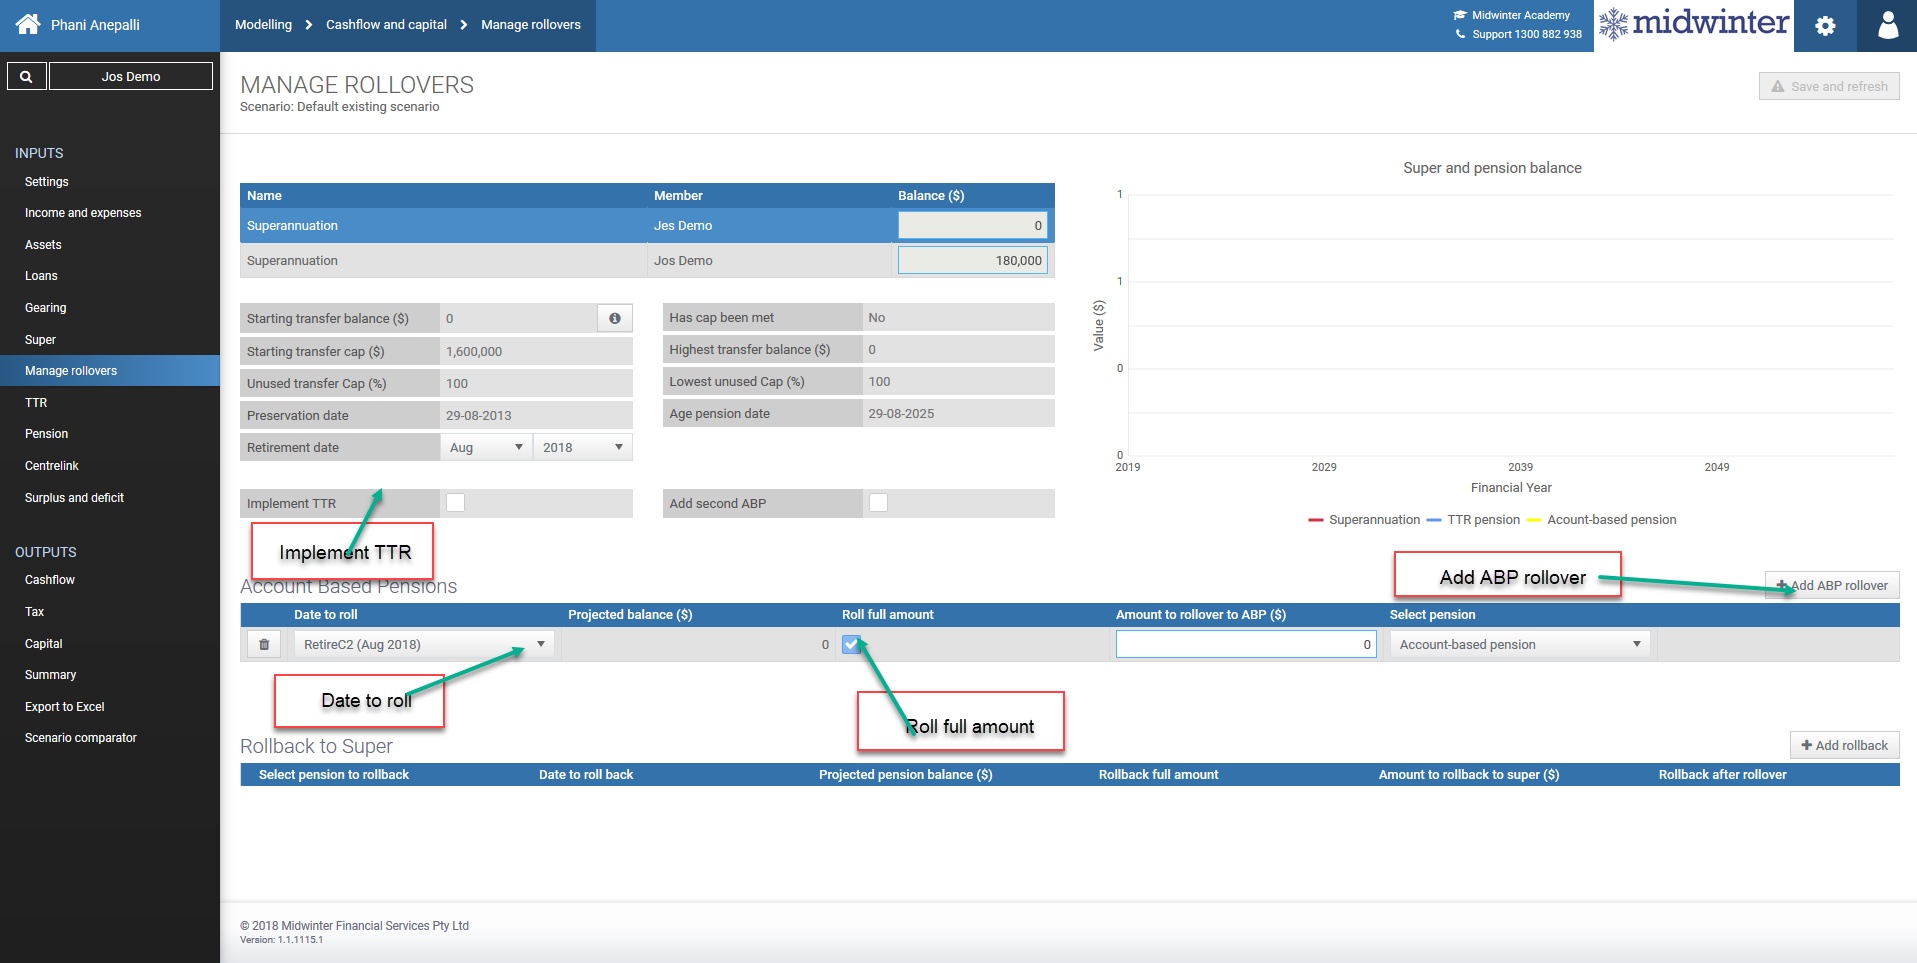
Manage rollovers
1.Select client from dropdown
2.Click “Manage rollovers”
3.Select date to roll
4.Untick Roll full amount and amend amount to rollover to ABP for partial rollover
5.Click “Add ABP rollover” to add amount for second rollover and adjust “Date to roll”
6.To roll amount into a second ABP, tick “add second ABP” and select ABP 2 from dropdown box
7.Click “OK”
SMSF
The SMSF menu allows you to model several scenarios for clients who own a SMSF.
To access the SMSF menu, ensure you have ticked SMSF in the settings menu under optional strategies.
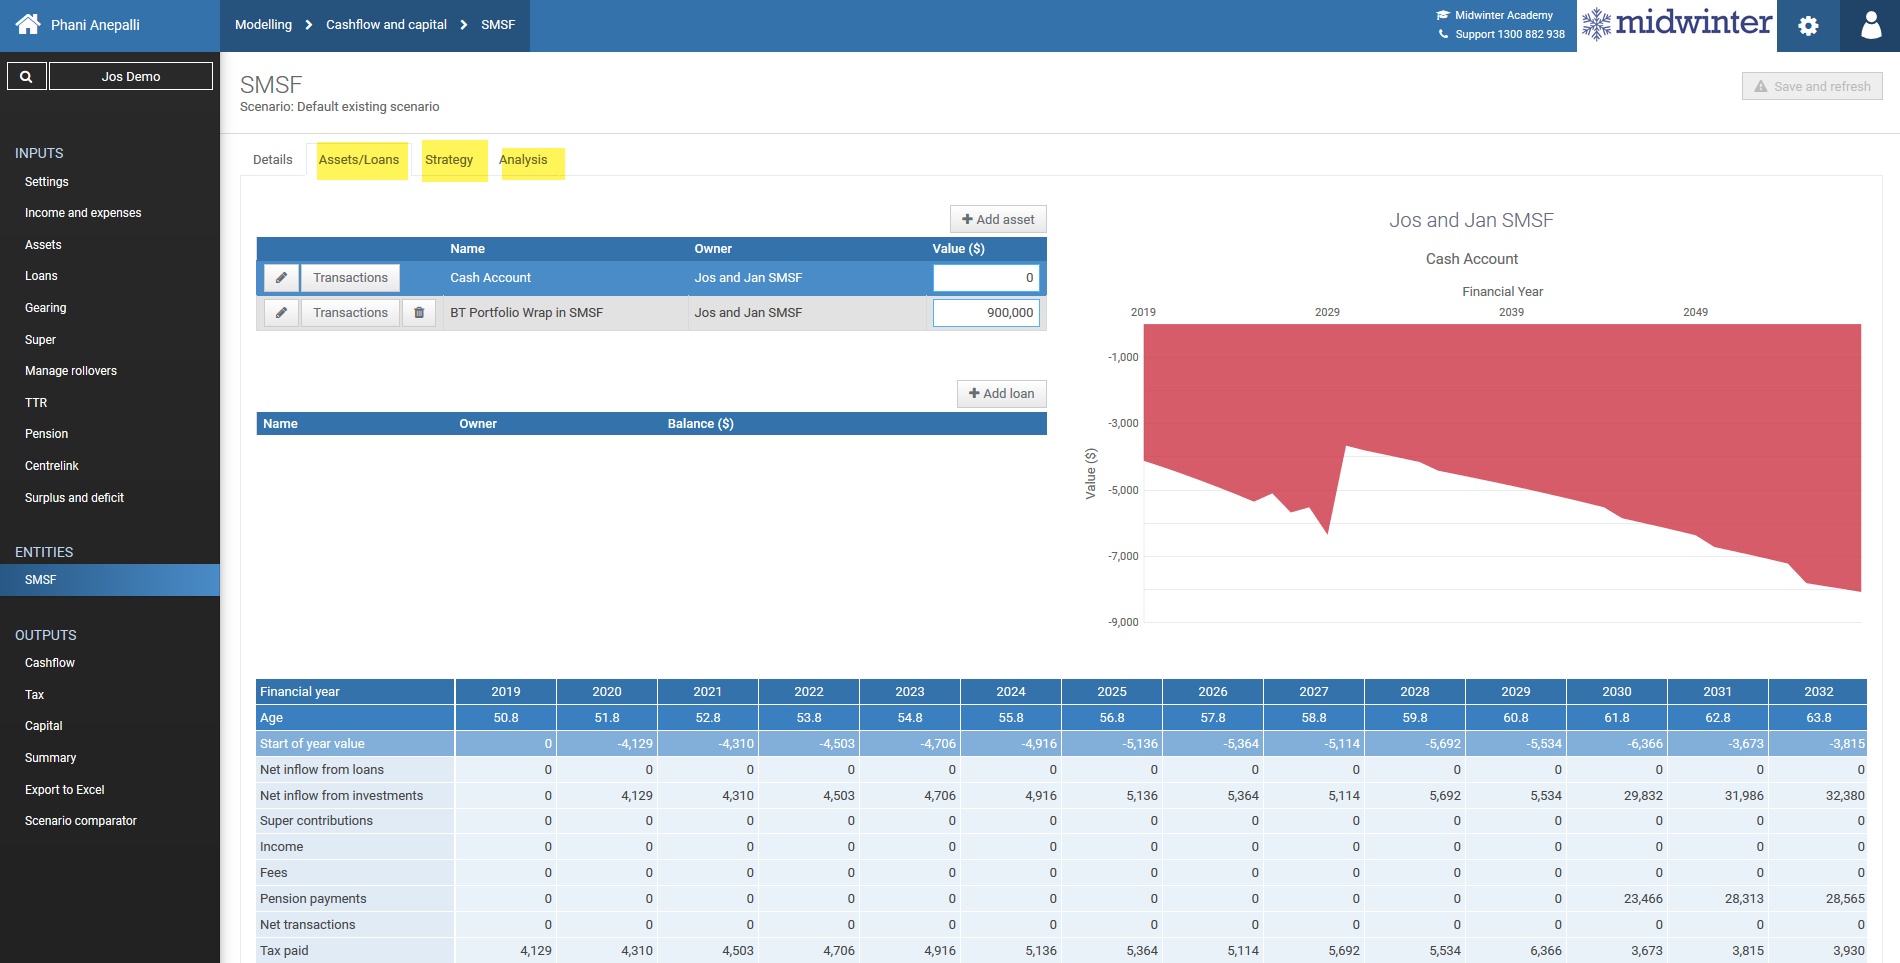
There are four tabs to review:
❄Details- this screen allows you to edit the SMSF settings for the selected scenario such as SMSF interest percentage, administration fees, tax free components and if pension is reversionary.
❄Investments/Loans – in this screen you can add investments and/or loans for the SMSF.
❄Strategy- this screen allows you to add concessional and non-concessional contributions as well as rollovers and pension drawdown for the SMSF. Additionally you are able to add any pension types, payments and commutations.
❄Analysis- this screen shows the effect the strategy has on tax and balance, both consolidated and per client.

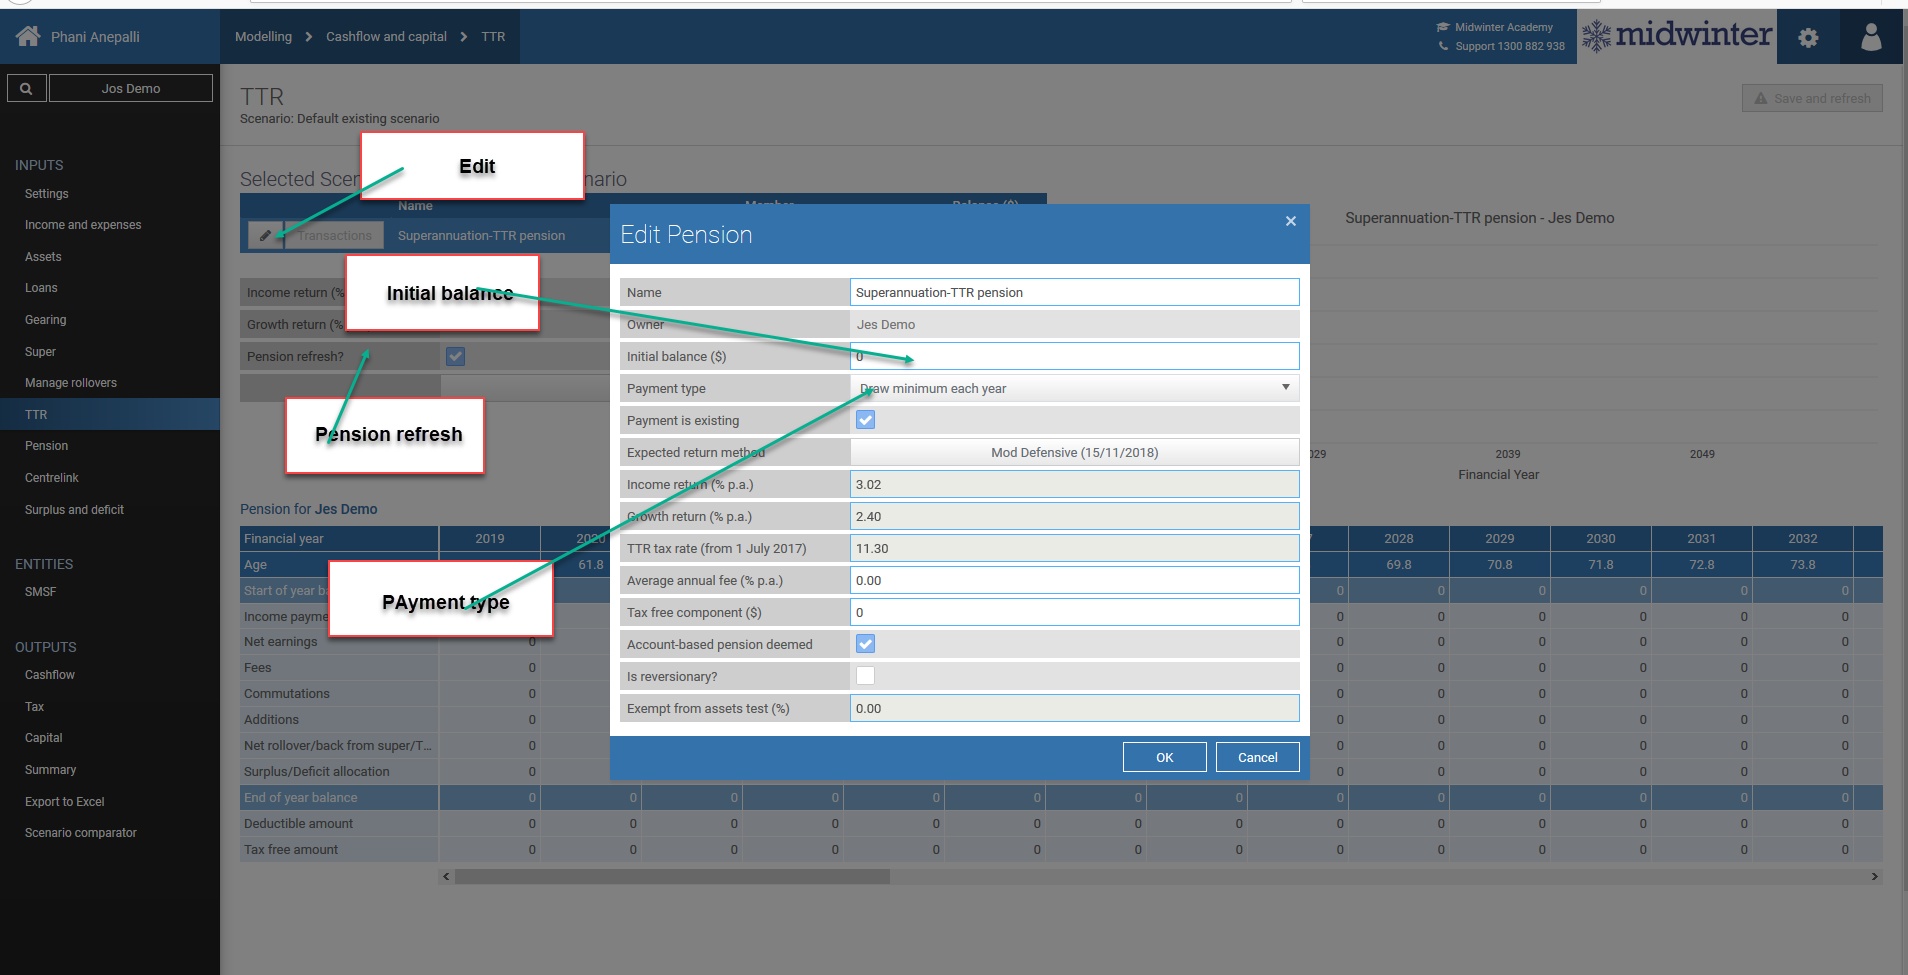
TTR
To allow a TTR menu to appear, ensure you tick the TTR check box in the settings menu under optional strategies.
An additional requirement to use the TTR strategy module is to ensure the “Implement TTR” check box is selected in the Superannuation menu under “Manage rollovers”.
In the TTR menu you can select owner, edit any details such as income payment, income and growth rate and alter amount of income in future years if required by clicking on the “Edit” button.
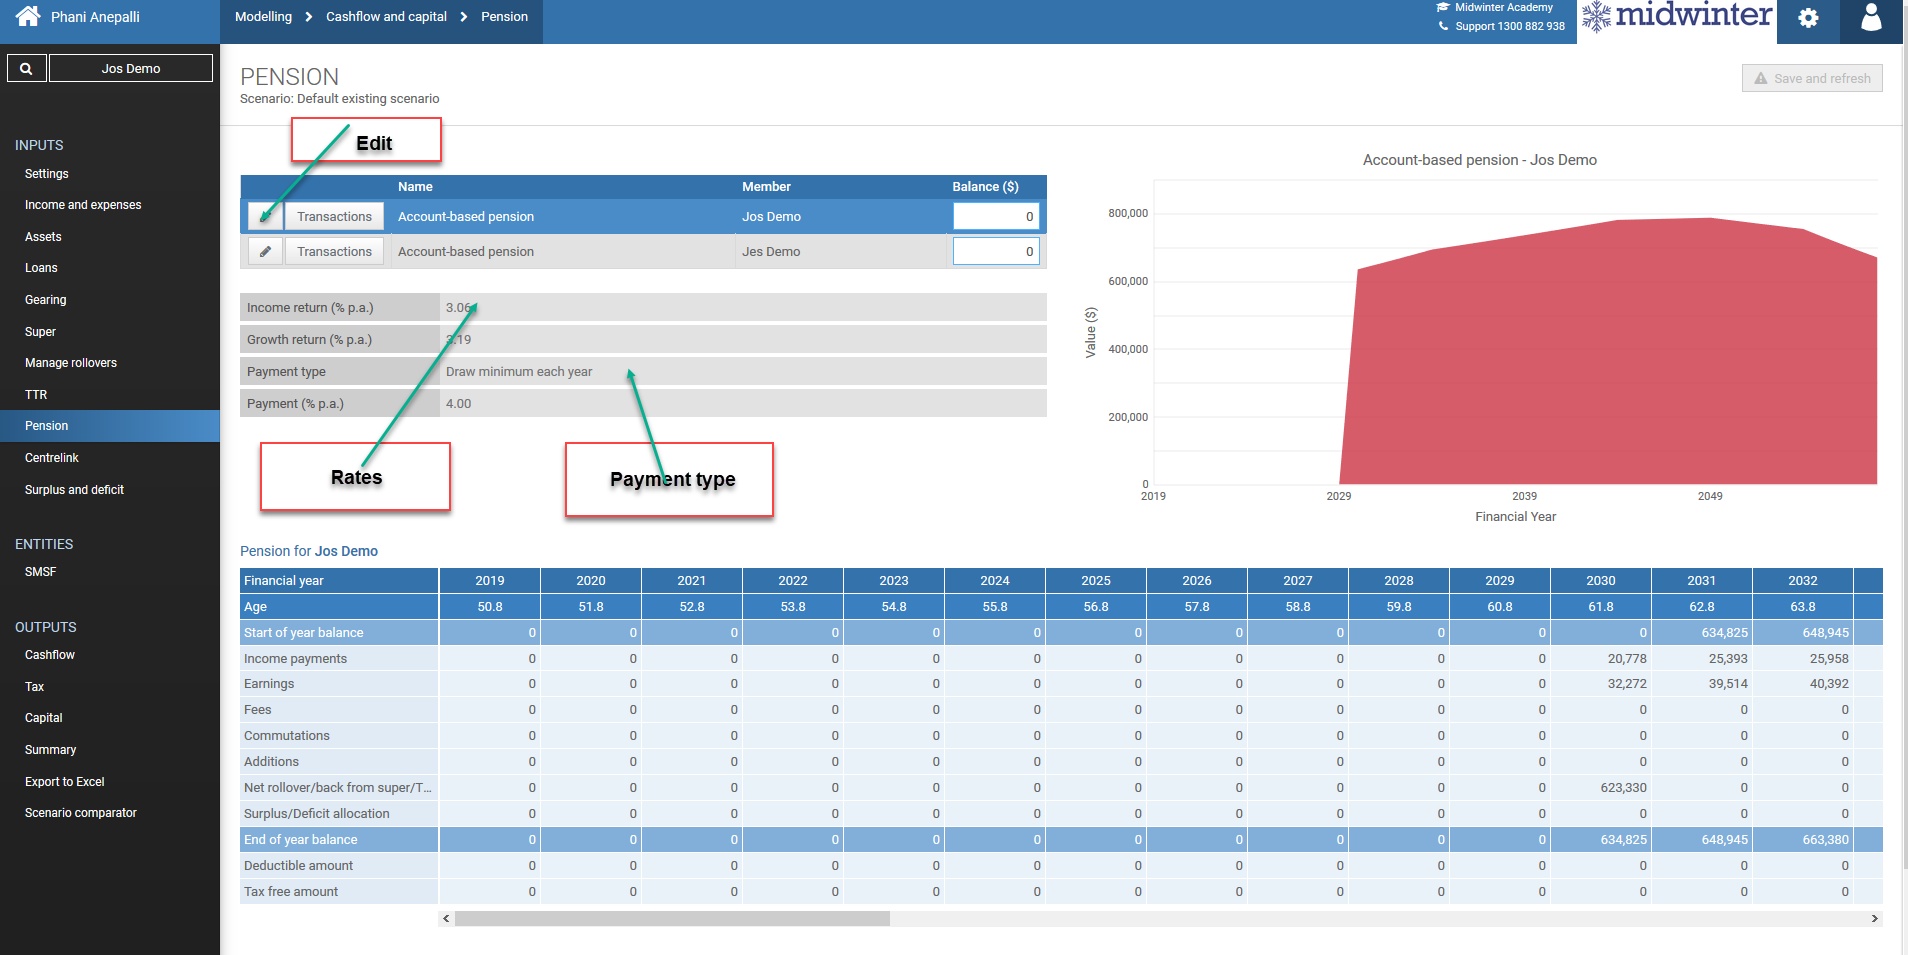
Pension
In the pensions menu you can view your clients amalgamated account based pension balances into one single value
AdviceOS rolls over all superannuation into an account based pension by default and this can be shown by viewing the graph and projection table at retirement age.
In the pension screen you can edit any pension details as required along with any income rates, growth rates, any payment type and amount of payment per annum, in percentage, dollar value or draw minimum amount.
In the edit section you are also able to alter the amount of income in future years.
Centrelink
In the Centrelink section you are able to determine your clients Centrelink eligibility. Any additional information can be entered in the summary tab as required such as how your clients assets are assessed from a Centrelink point of view, as well as changing any future date value by clicking the “Now-End” button.
The information in the pre-retirement tab will show any pre-retirement pensions/allowances based on the information entered as part of the fact find. In this tab you are also able to select any disability support pension or new start allowance your clients may have along with any Family Tax benefit or rent assistance.
The Post retirement tab will show you any Centrelink benefit your clients are eligible for in post-retirement age.

Surplus/Deficit
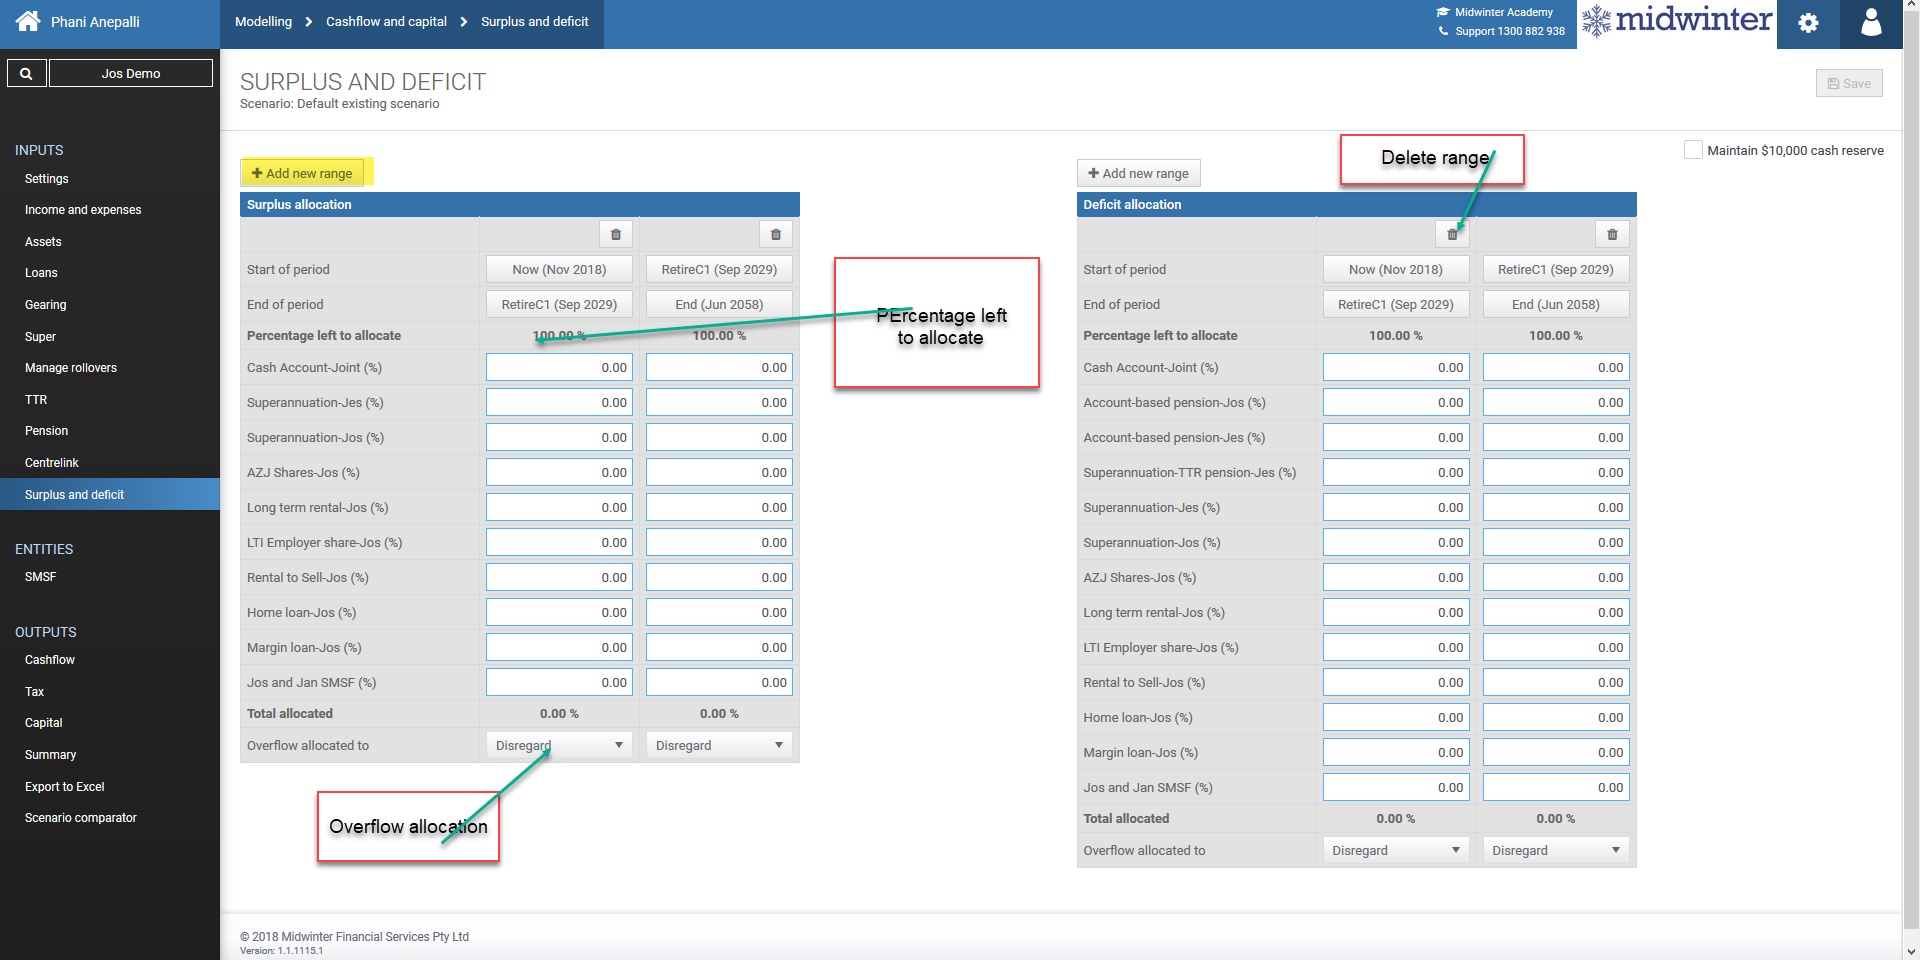
In the surplus and deficit menu you can alter how surplus and deficit is treated for cash purposes. This section also allows you to allocate funds (for surplus) to assets or where to allocate any deficit.
Any surplus or deficit your clients may have will be shown in the cashflow report- more details on this output in the following chapter of this document.
If your client has a surplus, you can allocate this as a percentage to superannuation, funds, home loan or cash account. You can also define the start and end of the period of the surplus allocation and select where to allocate any overflow.
If your clients have a deficit you are able to direct funds to be drawn from certain assets by allocating percentages and overflow much in the same manner as in the surplus section.
Should you need to add a new range, click “Add new range” or click delete to delete the range.
Click “Save” to save any information entered.